Increasing SSL security on Linux Servers
Today, if you are serving a website and/or App on your current server, I will talk about the SSL connection you need and the openssl library in connection with it. SSL (Secure Socket Layer) and TLS (Transport Layer Security) are a form of connection that allows people who want to connect to your server to communicate securely with your site. There are versions ranging from SSL v1-v3 in the past, and while sites generally use these SSL versions, SSL has now been abandoned by the sites and has been replaced by the more secure TLS. However, we will still need to use the word “ssl” in the narrative part and while editing the config files. To tell you this with a little humor, have you ever thought why when you want to download the 64 bit version of an application, why it is called “amd_64”? Because AMD was the first to switch to 64 bit, this naming remained as amd_64 as a sign of respect and/or habit. Likewise, although we are currently using TLS, the naming and configuration parameters remain “SSL”.
As in our previous article, I will explain the process again under three different headings as simple, recommended and advanced. Title contents are gradually considered according to personal requirements. Although the titles are linked to each other, leaving them at a desired stage will not pose a problem.
Simple configuration
First of all, we need to install the updates via the console with the package manager of the Linux version we are in.
Ubuntu: sudo apt update && sudo apt upgrade -y

Fedora: sudo yum update -y

Arch Linux: sudo pacman -Syyu
After the updates are installed, we start configuring the nginx/apache service (which is the service that allows you to receive external web connections) on your server (Ubuntu in my case). The file where the Nginx service settings are kept is generally located at “/etc/nginx/nginx.conf”. We need to open it with any of the text editors we use, but with a user with sudo (ie administrator) privileges.
If we continue on Ubuntu (Single IP for Single Server Configuration)
sudo nano /etc/nginx/nginx.config # Command to open the settings file
Titles to be added (changed if any)
listen 443 ssl http2; >> It serves to meet the requests coming to port 443 via ipv4 with http2 protocol and establish ssl connection.

listen [::]:443 ssl http2; >> It serves to meet the requests coming to port 443 over ipv6 with http2 protocol and establish ssl connection. (If you don't have ipv6 support or you don't want to support it natively, you can remove it)

server_name YOUR SERVER_NAME; >> If you do not want to set your server name as default, you can specify a Server Name Indicator. This only serves to meet the requests coming to your server name instead of meeting all incoming requests.

ssl_certificate /etc/letsencrypt/live/YOURSERVER_NAME/fullchain.pem; >> If you are using Let's Encrypt for free ssl, this is the default certificate location. Otherwise, replace it with your own certificate file.

ssl_certificate_key /etc/letsencrypt/live/YOURSERVER_NAME/privkey.pem; >> If you are using Let's Encrypt for free ssl, this is the default private key location. Otherwise replace it with your own private key file location.

ssl_protocols TLSv1.3 TLSv1.2; >> Required command to accept only the latest and most reliable TLS protocols.

ssl_prefer_server_ciphers on; >> During the conversation between the server and the client, I guess that they were talking about "ok, let's see what we have". In short, if it works for you, if it doesn't work for you, I don't talk.

ssl_ecdh_curve secp521r1:secp384r1; >> It is the command that tells us which curves we prefer when we need to use ecliptic curves.

ssl_ciphers DH-RSA-AES256-SHA:DH-RSA-AES256-SHA256:DHE-RSA-AES256-GCM-SHA384:DH-RSA-AES256-GCM-SHA384:TLS_AES_256_GCM_SHA384:TLS_CHACHA20_PODSADHESA:25_SHA256 -ECDSA-AES256-SHA:ECDH-RSA-AES256-SHA:AECDH-AES256-SHA:ECDHE-ECDSA-AES256-SHA384:ECDH-ECDSA-AES256-SHA384:ECDH-RSA-AES256-SHA384:ECDHE-ECDSA-AES256 -GCM-SHA384:ECDH-ECDSA-AES256-GCM-SHA384:ECDHE-RSA-AES256-GCM-SHA384:ECDH-RSA-AES256-GCM-SHA384:DHE-RSA-AES256-CCM:DHE-RSA-AES256-CCM8 :ECDHE-ECDSA-AES256-CCM:ECDHE-ECDSA-AES256-CCM8:ECDHE-RSA-CHACHA20-POLY1305:ECDHE-ECDSA-CHACHA20-POLY1305:DHE-RSA-CHACHA20-POLY1305; >> The code that tells the server to use only those SSL algorithms that I find the most reliable.
All ciphers for those who want to research one by one: “https://testssl.sh/openssl-iana.mapping.html"
If you want to check after making the settings: You can use the command “sudo nginx -t”. If you do not see an error message, you can apply the settings and restart the service with the command “sudo systemctl restart nginx” or “sudo service nginx restart”
Recommended settings
In addition to the previous settings, we will make some performance improvements, as well as some additional configurations that will enable your site to rank higher in SSL test sites. After that, we will make some improvements to ensure that some headers and resources of your site are not exploited by third party sites, which will be beneficial for your site’s user access.
Titles to be added (changed if any)
ssl_session_cache shared:TLS:2m; >> Code specifying how TLS connections will be distributed among workers (nginx workers) and for how long the connections will be shared

ssl_buffer_size 4k; >> The code that indicates how many containers the packets will be divided into when responding to SSL requests and sending packets after handshake. A lower value means more packets are sent but less overhead.

ssl_stapling on; >> Activates the OCSP stapling feature

ssl_stapling_verify on; Turns on the ability to verify OCSP stapling, including on parent and root servers.

resolver 1.1.1.1 1.0.0.1 2606:4700:4700::1111 2606:4700:4700::1001; >> Enables OCSP stapling verification with Cloudlfare. If you do not use IPV6 or do not want to support it natively, you can delete the IPv6 addresses.

add_header X-Content-Type-Options "nosniff" always; >> It is the header value that prevents browsers from sniffing to understand MIME contents.

add_header X-Xss-Protection "1; mode=block" always; >> It is a title that prevents the vulnerability to some extent by allowing users to see a white screen in a possible XSS vulnerability.

add_header X-Frame-Options "SAMEORIGIN" always; >> It prevents a page of your server from being shown on another page and/or being published one after the other with an i-frame etc. code in any way. Only you can publish a window from your own site within your own site.

add_header Referrer-Policy "no-referrer-when-downgrade" always; >> When you redirect or link to a site with lower security measures, it does not automatically add a referrer header and it is not clear that traffic is coming from your site.

add_header Content-Security-Policy "default-src 'self' https: data: 'unsafe-inline' 'unsafe-eval';" always; >> The title that regulates the conditions under which requests that you and other users can call from outside can be called. By default, I trust some sources that come over https.

add_header Permissions-Policy "camera=(), fullscreen=(self), geolocation=(), microphone=(), payment=()" always; >> It prevents the collection of information on your site with various types of poisoning (cache-poisoning or js-poisoning) by specifying which permissions you will want to the browser or which you will not need at all.
If you want to check after making the settings: You can use the command “sudo nginx -t”. If you do not see an error message, you can apply the settings and restart the service with the command “sudo systemctl restart nginx” or “sudo service nginx restart”.
Advanced Settings
First, we’ll add a header to your site to indicate that it should only be connected via ssl. In this way, those who have entered your site before and those who already have this title in their browser will not be able to access your site non-SSL even if they want it. Then we will staple the SSL certificates that should be used in HTTP sessions, and we will specify in advance which certificates will need to be connected next to the previous method. In this way, even if you are an authorized top certificate manager or root manager, they will not be able to connect to your site with the certificate signed on your behalf. E-Tugra Root Certificate provider residing in Turkey at the time signed a certificate to *.google.com. If you do a little research, you’ll find out when it happened and why (how bad it could cause). Now let’s start the final configuration part.
First, make sure that your site can be accessed over SSL without causing any problems. Then add one of the following headers to the nginx config file as per your request. But beware, only one.
add_header Strict-Transport-Security "max-age=2592000;" always; >> Header stating that your site can only be accessed over HTTPS for 30 days. (Not including subdomains)

add_header Strict-Transport-Security "max-age=2592000; includeSubDomains;" always; >> Header stating that your site can only be accessed over HTTPS for 30 days, including subdomains.

add_header Strict-Transport-Security "max-age=31536000; includeSubDomains;" always; >> Header stating that your site can only be accessed over HTTPS for 1 year, including subdomains.

add_header Strict-Transport-Security "max-age=31536000; includeSubDomains; preload" always; >> The header that instructs that your site can only be accessed over HTTPS for 1 year, including subdomains, and that this header is cached by browsers. In addition, new browsers will be aware of this title even if they have never visited your site before.

add_header Strict-Transport-Security "max-age=0; includeSubDomains"; >> Title for removing HSTS feature and preload list membership completely.
After adding the header mentioned above, now it’s time to staple the hash of the ssl certificate you used to the HTTP session. At this stage we need to extract a hash of your current certificate, hash the top signing authority’s certificate, and continue this hashing process until we’ve completed the entire chain, including the top root certificate authority. For this reason, we run the following commands respectively with a root user or a user with sudo authority. (The lecture was made specifically for Let’s Encrypt.)
1] cat /etc/letsencrypt/live/YOUR SERVER_NAME/cert.pem | openssl x509 -pubkey | openssl pkey -pubin -outform der | openssl dgst -sha256 -binary | base64 >> This command will extract the hash of your site's certificate. Copy the result value somewhere.
2] curl -s https://letsencrypt.org/certs/lets-encrypt-x4-cross-signed.pem | openssl x509 -pubkey | openssl pkey -pubin -outform der | openssl dgst -sha256 -binary | base64 >> This command will extract one of the multi-signed certificates of letsencrypt.
3] curl -s https://letsencrypt.org/certs/lets-encrypt-x3-cross-signed.pem | openssl x509 -pubkey | openssl pkey -pubin -outform der | openssl dgst -sha256 -binary | base64 >> This command will extract one of the multi-signed certificates of letsencrypt.
4] curl -s https://letsencrypt.org/certs/isrgrootx1.pem | openssl x509 -pubkey | openssl pkey -pubin -outform der | openssl dgst -sha256 -binary | base64 >> This command will extract the root (top) certificate of letsencrypt.
The following value is added to the Nginx config file
5] add_header Public-Key-Pins 'pin-sha256="FIRST_RESULT"; pin-sha256="SECOND_RESULT"; pin-sha256="TIP_END"; pin-sha256="FINISH_RESULT"; max-age=2592000; includeSubDomains' always; >> Allows you to connect to your site for 30 days only with the specified certificate. You can optionally increase the max-age value. Before your certificate validity period is less than 30 days, you must disable the header or obtain a new certificate and add it as the fifth value.
As a bonus, I'd like to show you another command that will take a long time for your server to execute, but is very useful.
6] openssl dhparam -out /etc/nginx/dhparams.pem 4096 >> This command can take between 15 minutes and 1 hour to execute.
After the process is finished, you need to add the following command to the nginx config file.
ssl_dhparam /etc/nginx/dhparam.pem; >> The command to change the values to be used during the Diffie-Hellman key exchange algorithm with the secret values we just created, apart from the default values.
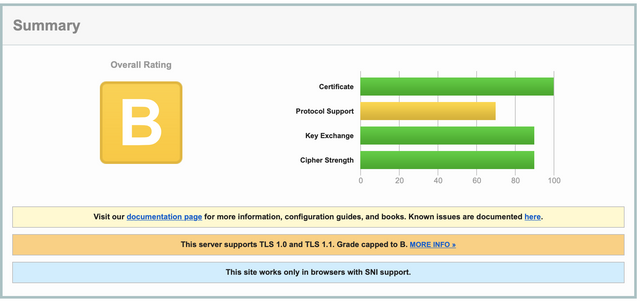
After making the settings, apply the settings with the command “sudo nginx -t” and then, if you do not see an error message, “sudo service nginx restart” and restart the service. Now the connection will be provided with the configuration and conditions you have specified. If you want to see the before/after scoring difference, you can look at the images below or test your own site at “https://www.ssllabs.com/ssltest/index.html".
BEFORE
AFTER
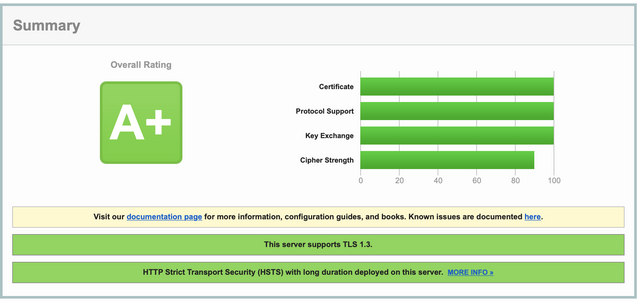
If you ask why Cipher Strength is not 100%, it is not possible to make 100% at the moment because of the “TLS_AES_128_GCM_SHA256 (0x1301)” that comes automatically with TLS 1.3 and is added even if we don’t want it. If you think that I will turn off TLS 1.3, then it will not come, then unfortunately your points are gone from somewhere else.
End
This article was previously published at https://teknolojirehberleri.xyz. In order to create a personal portfolio, I felt the need to republish it on my personal site.