Introduction and Summary
Today, we will make an in-depth review of OpenVPN, one of the most important software of recent times, in my opinion. In this review, we will first talk about what OpenVPN is used for. Then we will examine what we need to run the program and what needs to be done before the first run. Finally, I will try to explain what goes on in the background from the first moment the connection is started to the last step when the data is decrypted. Therefore, I guess our article will consist of 3 parts and a question-answer section if necessary. Now let’s buckle up and take a trip to the deep and gloomy world of the internet.
What is OpenVPN and what is it used for?
Today, there is almost no business that cannot be done online. Even our work, which is not normally online, has evolved to work from home due to the pandemic and the new normal. However, there were big problems both because it is a working method that we are not used to and because our people are not very good with technology. Before it became clear that people needed to connect from their home computers to their office computers, some companies came up with frivolous ideas such as sending office computers to employees’ homes. They understood very well how wrong this was from the feedback they received in a short time. In short, it was finally accepted that electronic devices should remain in the office and somehow a secure and sustainable connection should be made remotely. Of course, institutions found themselves in such needs before, but such a large-scale situation was not in question back then. Before the pandemic, it used various protocols such as PPTP, L2TP, IPSec, IKev2, SSTP and finally OpenVPN. These are usually abbreviations for certain long and fancy words and their basic logic is to connect two or more devices and make them act as if they are on the same network. I won’t talk much, as protocols prior to OpenVPN brought with them certain weaknesses, slowness, and technical difficulties with its implementation. OpenVPN is the name of the protocol and program that allows at least 2 devices in the role of server and client to connect to each other and do this in a way that meets industry standards. I’m using a remote desktop program, I seem to hear you say what is the need for this. Unfortunately, he and all other programs like him basically have to use this protocol. If you press the shield icon or the connection details in TeamViewer, one of the most famous, you can see the OpenVPN protocol.
What do we need to establish an OpenVPN connection?
First of all, OpenVPN must be installed on both the server and client (the device to be connected) side. Then, a settings (config) file should be edited that shows the conditions under which the devices will communicate. The main event is that this config file is generated and used by the client. This config file is divided into server_config used by the server and client_config used by the client.
The settings file maintained by the server contains the following entries
port 1194specifies which port it will receive a connection request to make the OpenVPN connection.proto tcpConnection possible over TCP or UDP. Setting entry entered for selection.dev tunTAP or TUN interface can be used. These are virtual interfaces. TAP layer 2 establishes a connection, while TUN layer 3 establishes a connection.user nobodyEnables connecting users to an unauthorized user on the server.group $NOGROUPIt allows connecting users to be linked to an unauthorized group on the server as a group.persist-keyAn authorization setting for the creation and restart of the virtual interfacepersist-tunAlso an authorization setting for the creation and restart of the virtual interfacekeepalive 10 120A setting for how many connections will be kept active and how long the active connection will be terminated if no communication is established.ifconfig-pool-persist ipp.txtA setting to keep the IP addresses given by OpenVPN to clients in the virtual network and give them the same addresses if they reconnectpush "dhcp-option DNS 1.1.1.1"A DNS setting for the server to use when exiting the networkcompressThe part where compression options are setdh noneA setting for turning Diffie-Hellman on or offecdh-curveIf you are using Elliptic Curve Diffie-Hellman, the setting next to which the curve you need to select is adjusteddh dh.pemsetting specifying the location of the PEM file you need to create beforehand if you are using Diffie-Hellmantls-crypt tls-crypt.keyRequired setting to encrypt TLS layer even before pre-shared mastertls-auth tls-auth.key 0setting that allows parties to be authenticated beyond encryption at the pre-handshake stage of the TLS layercrl-verify crl.pemSetting to check whether the generated certificates are revoked or not via the CRL listca ca.crtA setting that reports the location of the certificate of the certificate authority of the generated certificatecert $SERVER_NAME.crtA setting that tells the location of the server’s certificatekey $SERVER_NAME.keyA setting indicating the location of the required asymmetric secret key next to the server’s certificateauth $HMAC_ALGA setting describing which hash algorithm to use for the data channel and, if necessary,tls-authcipher $CIPHERA setting that tells which encryption algorithm to use for the data channelncp-ciphers $CIPHERA setting declaring which encryption algorithms the server can usetls-serverA setting that tells the server to use the TLS channel- A setting
tls-version-min 1.2reports the lowest version to be used on the TLS channel tls-cipher $CC_CIPHEREncryption is also used at TLS layer, except for data channel, which is the setting declaring control channel encryptionclient-config-dir /etc/openvpn/ccdSetting that tells where client settings files are keptstatus /var/log/openvpn/status.logSetting that tells where status reports are written and where log files are keptverb 3This setting, which is the abbreviation of the word Verbose, is the setting of how detailed the status report is to be given.
The client-side settings file contains the following entries
clientindicates that the device is in the client roleproto tcp-clientreports to use TCP as protocolremote $IP $PORTThe part where the IP address and Port number of the server(s) to be connected are setdev tunsets which of the TUN/TAP interfaces to useresolve-retry infiniteWe tell you how long to wait if address resolution is delayed due to IP or DNSnobindsetting to not connect to any address in the localpersist-keyAllows key files to be read without additional authorization on rebootpersist-tunIt also allows the TUN/TAP interface to be woken up without authorization on rebootremote-cert-tls serverVerifies the certificate of the connected server at TLS layerverify-x509-name $SERVER_NAME nameCommand that tells the name in the certificate that the server will return to and what the name of the server should beauth $HMAC_ALGCommand that tells which algorithm to use for validationauth-nocacheDoes not cache the password required for logincipher $CIPHERCommand to select the algorithm to be used for encryptiontls-clientenables TLS during TLS communication and assumes the client roletls-version-min 1.2Sets the lowest TLS versiontls-cipher $CC_CIPHERselects the encryption algorithm to use in the TLS control channelignore-unknown-option block-outside-dnsPrevents unknown DNS addresses from being usedsetenv opt block-outside-dnsblocks DNS leaks for Windows 10verb 3Determines the degree of reportingcompressCompression algorithm settings are reported here"<ca>/etc/openvpn/easy-rsa/pki/ca.crt</ca>"Hard-Coded embedding of expected server certificate authority file"<cert>/etc/openvpn/easy-rsa/pki/issued/$CLIENT.crt</cert>"Hard-Coded embedding of client certificate file"<key>/etc/openvpn/easy-rsa/pki/private/$CLIENT.key</key>"Hard-Coded embedding of client asymmetric secret key"<tls-crypt>/etc/openvpn/tls-crypt.key</tls-crypt>"Specifying the key file for TLS crypt"<tls-auth>/etc/openvpn/tls-auth.key</tls-auth>"Specifying the key file for TLS authkey-direction 1assigns roles to client and server for TLS layer encryption (0 and 1)
You can find detailed documentation of these settings and more on the OpenVPN web page.
What happens when establishing an OpenVPN connection?
Every time I connect with OpenVPN I feel like R2-D2 hijacking their Starfleet plans. People don’t always want to find themselves in deep scrutiny and may ask someone to explain to them what and how. In my purpose of writing this article, I actually asked myself this question and I put a lot of effort to get the answer. I don’t want you to work so hard, but I can’t say that you should upload it immediately, don’t think about the rest, it’s my job. As I promised at the beginning, I will explain this process to you in depth and leave the decision to you. Here’s how the process works in an OpenVPN connection, pros and cons (as I’ve been able to figure it out so far). You first establish a TCP/UDP connection. You run a process like any application that uses TCP, and then you switch to the TLS layer. You are doing handshake and some authentication at TLS layer. This layer is also called the control channel. Then a certain communication is fixed and the data channel is passed. The process of encrypting and decrypting the data packets to be sent this time in the data or data channel begins. For this, devices are talking to each other and data is started to be sent under certain common conditions. In short, at the end of the process I have described in this way, the communication we started from 0 ends with the safe and desired data access to us, or requests are sent again, this time in a reverse way, over the connection that is kept open. Thus, a system like nested pipes emerges. If you need to write the only important thing required for the article here:
- It will be
TLS_ECDHE_ECDSA_WITH_AES_256_GCM_SHA384_P512.- Here the
TLSinput specifies that the control channel will be executed over the TLS layer. Other alternatives areSSLorNULL. - The
ECDHEinput specifies that the first pre-key will be generated using the Elliptic Diffie-Hellman algorithm. Other alternatives are to useDHE,DHor not. - The
ECDSAdata indicates that the Elliptic Digital Signature Certificate Algorithm will be used for mutual authentication and asymmetric key. Another available alternative isRSA. No need to count the others. - Specifies the encryption algorithm to be used on the
AES_256_GCMdata channel. Other alternatives areAES-128-CBC,AES-128-GCMandAES-256-CBC SHA384specifies the hash algorithm to use. The other alternative isSHA256.P512allows the elliptic curve to be used to be selected as Prime-512. Other alternatives areP-256andP-384.
- Here the
The process of establishing the TCP connection
Now, if you have an approximate picture of the process in your mind, I start with the explanation of the TCP process. Let’s say we have a client and a server in our case, and the connection is just these two. The client sends a SYN (m) packet to the server it wants to connect to. In response, the server sends a SYN (n) packet and an ACK (m+1) packet over the same port. The client that receives this also returns as ACK (n+1) in response, and a 3-way TCP handshake or 3-Way TCP handshake takes place. Thus, we have an open channel between client and server over the specified port.

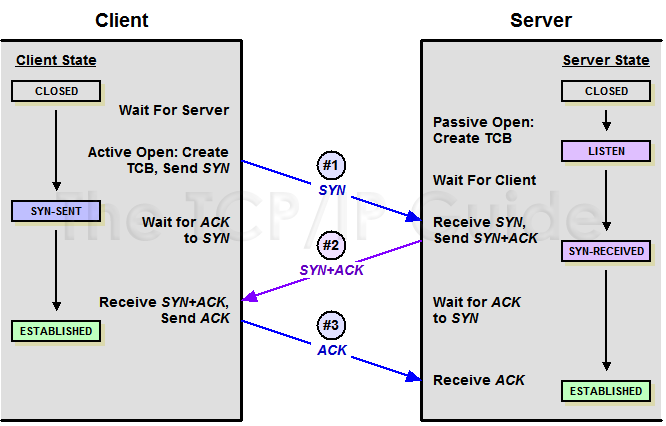
As can be seen in the photos, if the process runs smoothly, communication can be made in 3 steps. But if you ask why we are doing this in 3 steps, can’t it be done in a shorter way? I would say (for now) no, no, for a full-duplex communication, both parties need to send SYN and ACK packets. Maybe I’ll tell you different ways in the future, but for now this is how it is. Anyway, the TCP/UDP part is always short and simple.
Process running in TLS layer
After establishing a communication over TCP, the client is the person who takes the conversation to another level. Clients always request something from the server or request an answer. In general, servers are not seen to respond to a request that did not come to them. The process proceeds according to the principle of demand first, then supply. Yes, the parties are at the TLS layer now. The client first says hello to the server. Not a joke, it’s real. The first packet sent by the client is called the Client-Hello packet. Next to this package (in order to speed up the process), the Supported-Chipers package that specifies the encryption algorithms it supports, a randomly generated number by the client, an SNI server name indicator if more than one service is running on the same IP address, and the session ID if necessary. . The server’s response to this is, first of all, a polite hello. Because the first packet that the server sends in response is called the Server-Hello packet. Next to this package, the Selected-Chiper package, which specifies the server certificate, the encryption algorithms it supports, and the algorithm it chooses, sends a random number it generates, the Session ID if necessary, and an SNI-like ID if more than one client is connecting over the same IP. . The client first verifies with the server certificate whether it is really the person it is waiting for by starting the communication. In addition, in some cases, the server verifies with a certificate whether the client is one of the clients it expects. If this mutual-authentication process is positive, the next stage is passed. The key generation and exchange process is triggered. At this stage, the client again steps in and says that he wants to change the key with the algorithm they have determined during this communication, which is considered insecure. Parties begin to generate a prekey with Diffie-Hellman or ECDHE. For this, pre-secrets are shared by the client and server. The answers found by performing a number of mathematical operations are sent to the top and the same result is reached by performing mathematical operations again. The result is the first fore-key they’ve securely created between them. After that, with the encryption algorithm they determined,
A data channel other than the control channel is created to communicate and the process continues from there.
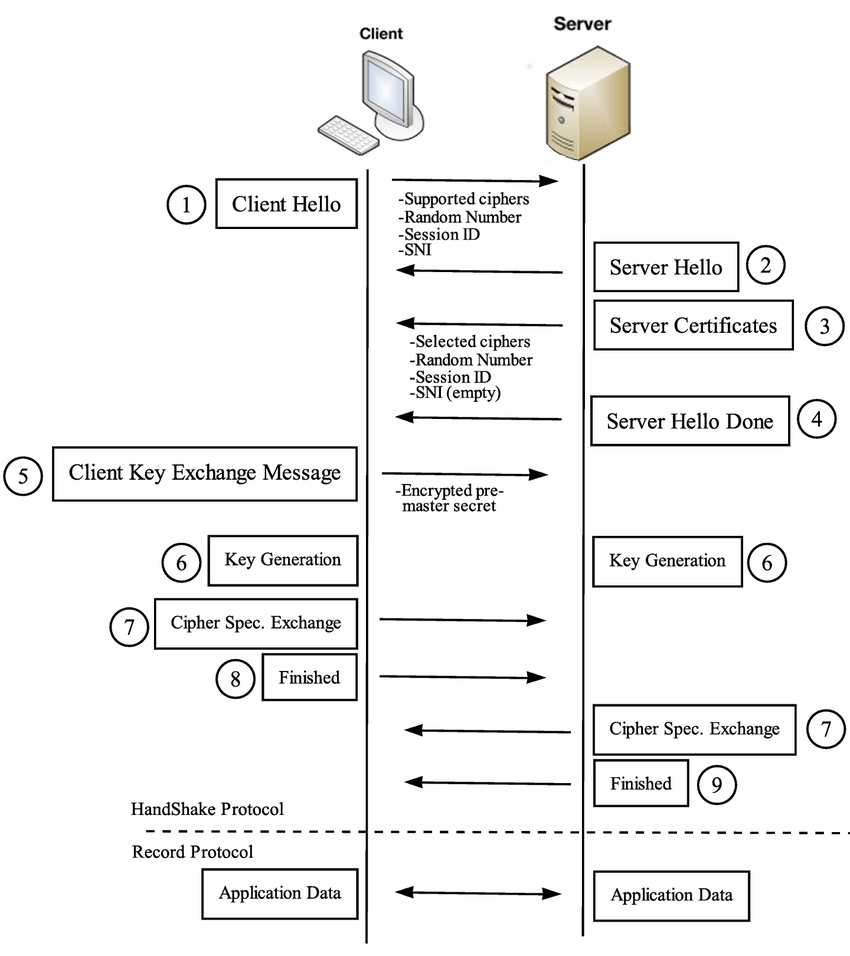
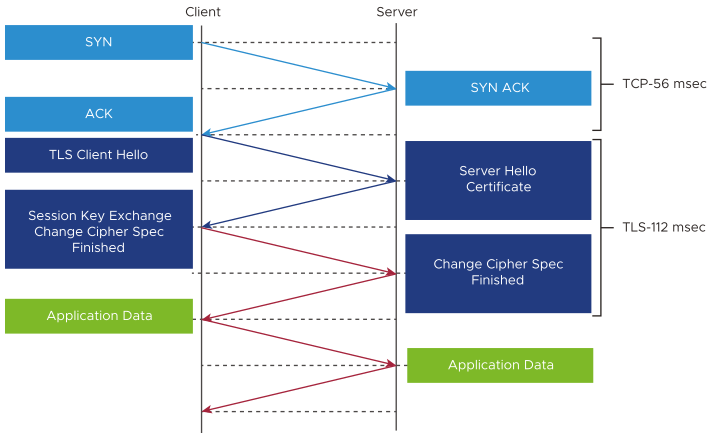
As can be seen in the photos, the process is almost the same as when connecting to a web page. Only certain stages are added, removed or changed according to needs. For example, in accordance with PFS, which stands for Advanced Privacy, the parties do not transmit the front-key with the server’s asymmetric key. Because in this case, since the same key will be used for each session, the data will be stored and then the data will be readable retrospectively by waiting for a day when the key is revealed. That’s why this change was made. Again, in accordance with the zero trust threat model, I want each layer and process to advance the process without trusting the other to do their job correctly. That’s why we want the packets to be encrypted according to the tls-auth feature and to verify the integrity of the incoming and outgoing data, even at that first communication moment in the TLS layer. From the first moment you say hello, third parties will not be able to understand what you are talking about and at what stage you are. For this, the first communication is started with a predetermined key(s) and if necessary, these keys are renewed at regular intervals. Thus, even until the first pre-key is created in the TLS layer, confidentiality is not compromised and unauthorized parties are not created in vain.
Process running in the data layer
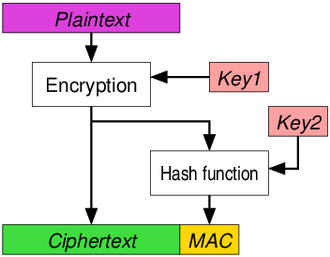
If this whole process has been completed successfully and the data channel has been passed, you have now come to the best part of the job. Data will be encrypted with AES encryption method. During encryption, the tables will be shuffled according to the CBC-GCM counter mode according to your selection, and a 128 or 256-bit encryption key will be used in this process according to your selection. Of course, whatever you choose, the encryption block length will be 128 bits. Only the encryption key length changes. AES-256-GCM that I have chosen for this explanation is an AEAD encryption type. It summarizes the data it sends independently from other channels and processes at a certain stage and sends it together with the summary. Thus, authentication and encryption functions are fulfilled in AEAD, which stands for ‘Authentication Encryption with associated data’. There is a problem that requires a distinction to be made here. At what stage and in which order will we use the encryption and hashing algorithms?
 | 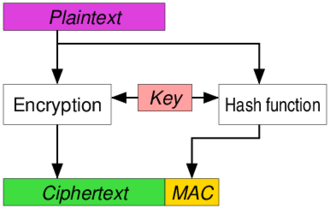 |  |
https://en.wikipedia.org/wiki/Authenticated_encryption (Date: 08.04.2023)
According to EtM, which is the first approach, the data is first encrypted, then encrypted with another key as a result of the digest, and the resulting result is sent together in blocks. If we look at real-world solutions that use it, the IPSec protocol will come to mind first. This is the only method that can achieve the highest security definition in AE, but this can only be achieved if the MAC algorithm used is free of corruption or has not yet been cracked. Various EtM cipher suites are also available for SSHv2. Note, however, that key separation is mandatory for data and digest (different keys must be used for encryption and key hashing), otherwise you may end up with a potentially insecure result depending on the particular encryption method and hash function used.
According to the second approach, E&M, plain text data is encrypted and a summary of the encryption state of the plain text data is added next to it. Although only one key is used here, the fact that there are two different results (encryption result and digest result) for the same data clearly shows that the security is not good enough. As a real-world solution using this system, we can cite the first versions of SSH as an example. In order to improve this, methods such as encrypting the sent summary file with the same key were tried.
According to MtE, which is the third and last approach that I know of, a summary file is generated based on plain text. Then the plaintext and digest file together are encrypted with the key. The ciphertext and ciphertext file are sent together. If we look at real world solutions that use it, first and foremost are SSL/TLS implementations. We all know how reliable and sustainable SSL/TLS applications are in themselves. Beyond that, improvements such as
MAC-then-pad-then-encrypthave been made over the years to increase security. According to this improvement, first the plain text is digested, then filled up to the block size, and then the encryption is done. This results in an even more reliable encryption result. But there are cases where the padding mechanism causes attacks like Padding Oracle if it makes certain mistakes.
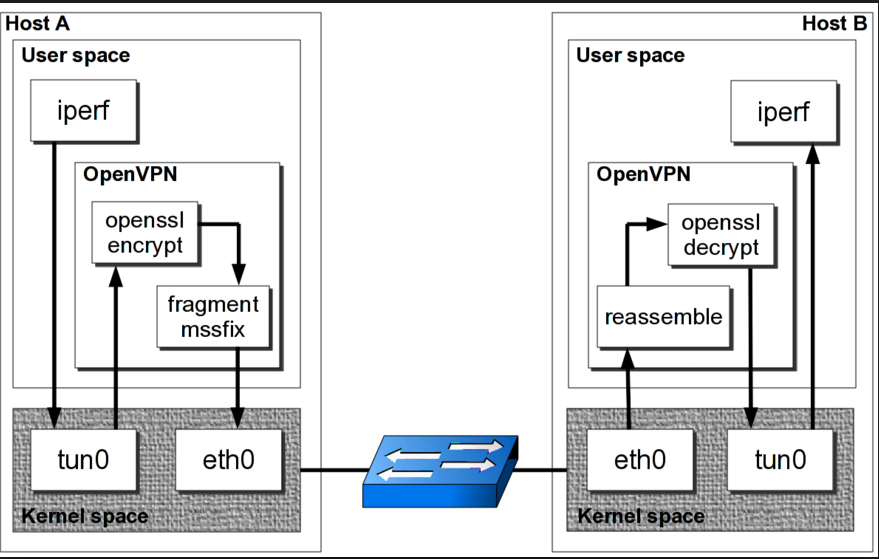
After selecting the AEAD approach to be used, the path shown in the graphic above is followed according to the use of TAP or TUN. According to this path, the action done/desired to be done in the user area goes to TAP/TUN adapters at the kernel level. Because these adapters are at the kernel level, they operate very quickly. Then the virtual adapters do the necessary encryption with the relevant library, add the digest if necessary, and set the packet size. Then the server sends packets sequentially to the client’s Ethernet interface over the Ethernet interface. The client that receives it reconfigures the packages, organizes them, combines them if necessary, and decrypts them with the necessary libraries. After decrypting it, it transmits the client to the end user via the virtual adapter. Thus, as a result of all these mathematical operations and efforts, after a few cycles, the user reached the desired content. It is quite long to explain, but very easy to use, dear readers. You just have to visit the relevant script page on my GitHub page. The related script makes all these adjustments interactively for you. All you have to do is sit back and enjoy.
FAQ and End
Received me via mail, Fosstodon, or GitHub I will try to add questions here from time to time. Thus, historically, you will be able to reach the result directly without thinking about what kind of questions have arisen on which date or whether there is a solution. Apart from this, if there are questions that require extra explanation without changing the technical document, I think to include them in this section.